
How to Brick Stitch: Increasing and Decreasing

In brick stitch, every row is either one bead longer or one bead shorter than the row below it. The beads sit offset like bricks in a wall, so two rows can never be exactly the same length. Once you know how to start an increase row and a decrease row, you can follow almost any brick stitch pattern, from simple stripes to triangle and hexagon earrings.
This tutorial walks you through it with the same graphics we use in our kit instructions and how-to videos: the ladder that starts every piece, then a decrease row, then an increase row.
What you'll need

Cylinder seed beads in two colors (we use Miyuki Delicas; alternating colors by row makes it easy to see each row)
A beading needle and beading thread
Small scissors
A microfiber cloth or bead tray, so your beads don't roll away
Tip: put your beads on the cloth in small piles by color before you start.
A quick word on bridges. Every brick stitch row is attached to the thread bridges of the row below: the little loops of thread that run between each pair of beads. You never sew through the beads of the row below. You just catch the bridge and come back up through your new bead.
Step 1: Make the ladder
Every brick stitch piece starts with a ladder: a single row of beads stitched side by side. It becomes your first row, and its thread bridges hold up row 2.
1. String the first 2 beads. Slide them down your thread, leaving a 2 to 3 inch tail at the start.

2. Circle back. Sew back up through bead 1, then down through bead 2. The two beads now sit side by side.

3. Add the next bead. Pick up 1 bead, sew back through the bead before it, then forward through the new bead. Repeat until the ladder is as long as your pattern's first row.
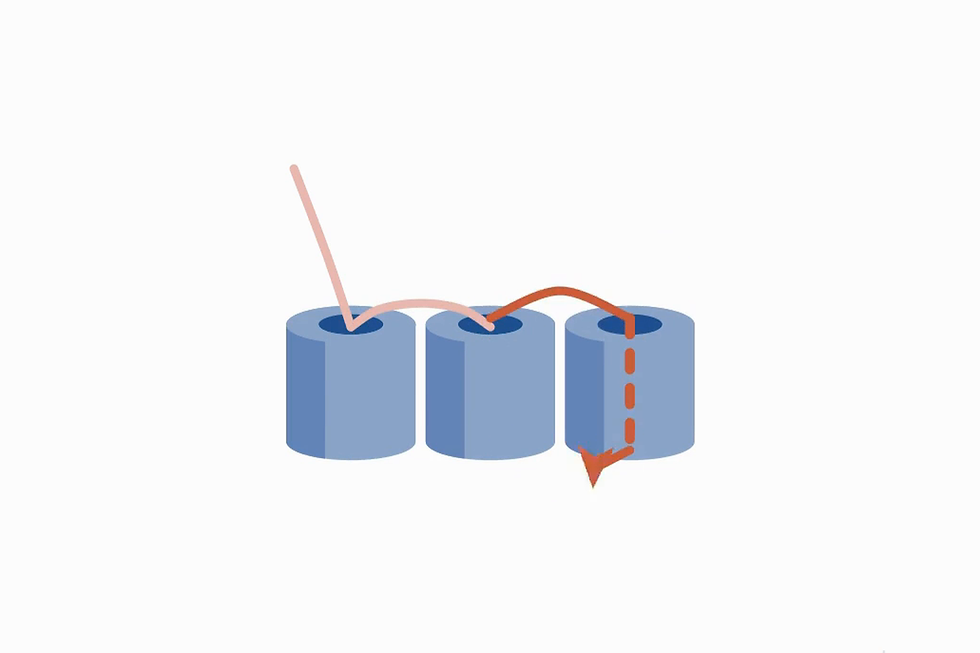
4. Strengthen the end. Go through the last 2 beads one more time, continuing in the same direction. Finish with your thread coming out of the top of the last bead, ready for row 2.

How to decrease (each row 1 bead shorter)
A decrease row starts on the second thread bridge, so the new row sits inside the row below and ends up one bead shorter. In this example we start with a ladder of 6, then stitch a row of 5 and a row of 4.
1. Pick up 2 beads. With your thread coming out of the top of the last ladder bead, pick up 2 new beads.

2. Stitch them to the second bridge. Skip the first bridge. Pass your needle under the second thread bridge, then come back up through the second new bead.

3. Lock the pair. Go down through the first new bead, then back up through the second. This keeps the first two beads standing straight.

4. Add 1 bead per bridge. Pick up 1 bead, pass under the next bridge, and come back up through the same bead. Repeat across the row.

5. Lock the end of the row. After the last bead, loop back through the last 2 beads once more. Your row of 5 is done.

6. Start the next row the same way. Pick up 2 beads, stitch them to the second bridge, and keep going. This row will have 4 beads.

7. Finished. Each row steps in, giving you the tapered shape you see on triangle and hexagon patterns.

How to increase (each row 1 bead longer)
An increase row starts on the first thread bridge, so the outer bead hangs past the edge, and ends with an extra bead on the last bridge. In this example we start with a ladder of 4, then stitch a row of 5 and a row of 6.
1. Pick up 2 beads. With your thread coming out of the top of the last ladder bead, pick up 2 new beads.

2. Stitch them to the first bridge. Pass your needle under the very first thread bridge, then come back up through the second new bead. Lock the pair: down through the first bead, back up through the second.

3. Add 1 bead per bridge. Pick up 1 bead, pass under the next bridge, and come back up through the same bead. Repeat across the row.
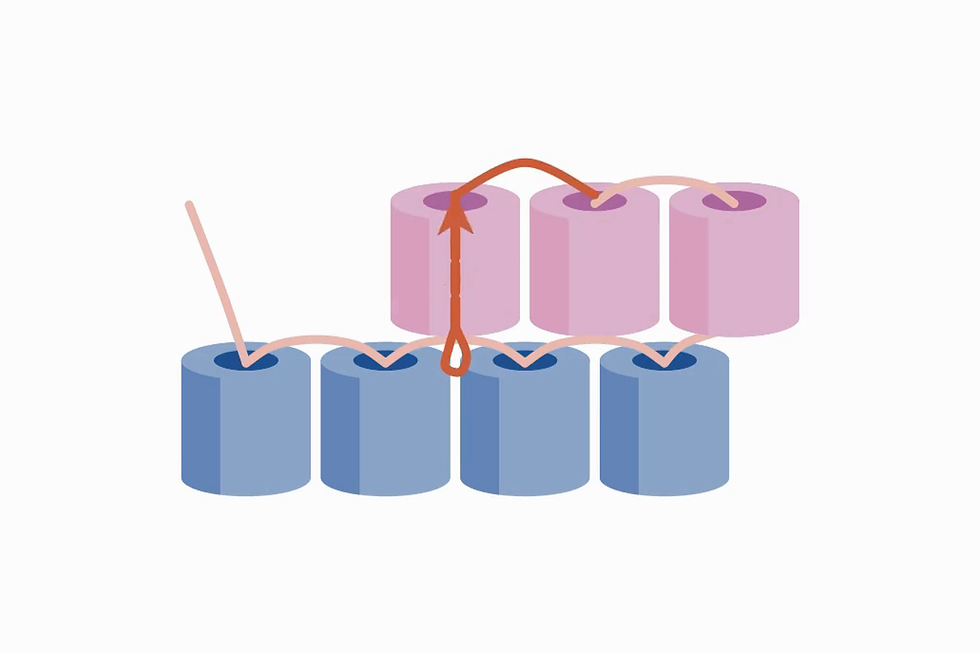
4. Add an extra bead on the last bridge. When you reach the end, stitch one more bead to the same last bridge. Two beads now share that bridge, and the new outer bead hangs past the edge on this side too.

5. Lock the end of the row. Loop back through the last 2 beads once more. Your row of 5 is done.
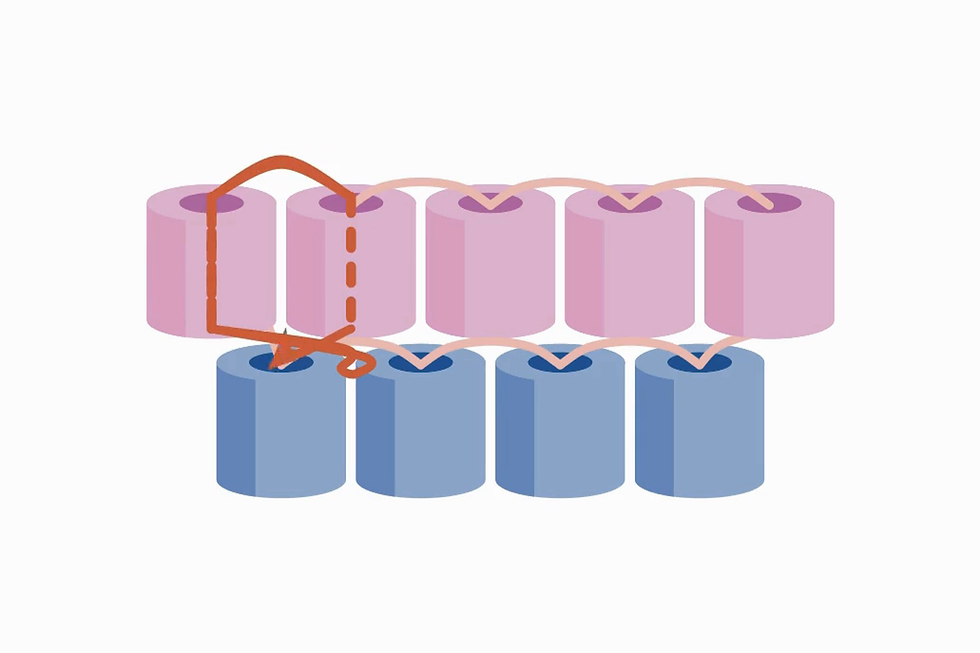
6. Start the next row the same way. Pick up 2 beads, stitch them to the first bridge, and keep going. This row will have 6 beads.

7. Finished. Each row steps out, so the piece gets wider as you go.

Most earring patterns use both: increase rows to widen the shape, then decrease rows to bring it back in. A hexagon is exactly that, increase up to the widest row and decrease back down.
The whole thing on one page
Here are the brick stitch instructions from our earring kits, all on one sheet. Save it or print it to keep beside you while you stitch.

A few tips before you start
Use two colors while you learn. Alternating colors by row makes it easy to see which bridge you're on.
Keep your tension snug, not tight. Pull each bead into place so it sits upright, but don't pull so hard the work curls.
Don't cut your thread at the end. You'll use it to weave in, or to attach the beadwork to a frame.
Handmade isn't perfect. A slightly crooked first row is part of learning something new.
Watch it in action
Prefer to watch? Each technique has a short video showing every pass of the thread. Follow us on Instagram, TikTok and YouTube for more beading tutorials.
Try it with a kit
Our earring kits come with everything you need: Miyuki Delica beads, a beading needle and thread, scissors, a bead tray, a microfiber cloth, gold frames and earring hooks, and illustrated instructions like the ones above. Kits are launching soon at anyamariestudio.com.


Comments